销售热线:4006222571
售后热线:4006333571

MRI Examination Guide For Nurotron Cochlear Implant
MRI Safety Information
Nurotron cochlear implant CS-10A is MRConditional. Before MRI examination, the patient should clearly inform Nurotronof which MRI examination is to be performed. You can contact local Nurotron staffor Nurotron clinical personnel through customer service hotline 400-6333571. Visit www.nurotron.com/MRIWarning for current MRI conditional labelling. Before MRI, thepatients should see their implantation surgeon to make sure they are safe totake MRI examination.

All externalprocessors and accessories are MR Unsafe. Patient should remove them beforeentering MRI room.

CS-10A cochlear implant is MRI Conditional andcan ONLY be done with a 1.5T or 3.0Tclosed bore MRI. During MRI, the implant magnet may move from normal positionif not properly bonded; the magnet strength may change; Patients may feeldiscomfort or pain in the implant site. The magnet and the metallic shell ofimplant can cause artifact. 1.5T MRI can be done with implant magnet in positionif Nurotron’s MRI examination guide is followed. For 3T MRI, implant magnetshould be removed by a qualified surgeon. Maximum spatial gradient of the static magneticfield is to be no greater than 1000 Gauss/cm (10T/m) for 3T MRI and 500Gauss/cm (5T/m) for 1.5T MRI.
MRI Warnings
Do not allowpatients with a CS-10A cochlear implant to be in the area of an MRI scannerunless the following conditions have been met:
· The external sound processor and headpiece are removed beforeentering a room where an MRI scanner is located.
· Patient has no fever.
· For 3T MRI, implant magnet should be removed by a qualified surgeon.
· For 1.5T MRI with implant magnet in position, the bandagingprocedure in Nurotron’s MRI examination guide should be followed, to avoidmagnet movement, patient discomfort, or trauma and pain to the patient.
· Caution: The bandaging procedure in Nurotron’s MRI examination guidewas developed to prevent magnet displacement and counteract magnet torqueduring a 1.5T MRI procedure, but some discomfort and pain at the implant sitemay still be experienced. Please consult with your physician if this is anissue.
· Caution: If discomfort persists following an MRI, please notify yourphysician.
Caution: Please consult with your physicianprior to MRI to determine if the benefits of MRI are worthwhile over otherimaging techniques.
3.0T with the magnet removed
· Maximum spatial gradient of staticmagnetic field no greater than 1000 Gauss/cm (10 T/m)
· Maximum RMS gradient magnetic fielddB/dt no greater than 42 T/s
· Maximum MR system reported, whole bodyaveraged specific absorption rate (SAR) of ≤ 2 W/kg at 3T (Normal Operating Mode) for RF body coils
· Under the scan conditions defined abovethe CS-10A series implant is expected to produce a maximum temperature rise of<3°C after 15 minutes of continuous 3T scanning.
After 15 minutes of continuous MRI scanning,take break at least 27 minutes and make sure there is no overheating in theimplant position before the next MRI scanning.
1.5T with the magnet in place
· Maximum spatial gradient of staticmagnetic field no greater than 500 Gauss/cm (5 T/m)
· Maximum RMS gradient magnetic fielddB/dt no greater than 42 T/s
· Maximum MR system reported, whole bodyaveraged specific absorption rate (SAR) of ≤ 2 W/kg at 1.5T (Normal Operating Mode) for RF body coils
· Under the scan conditions defined abovethe CS-10A series implant is expected to produce a maximum temperature rise of<3°C after 15 minutes of continuous 1.5T scanning.
After 15 minutes of continuous MRI scanning,take break at least 27 minutes and make sure there is no overheating in theimplant position before the next MRI scanning.
Guide For Radiologist
1. The preparation before MRI examination
Theradiologist should be aware of the following information before performing MRIon the patient.
1) The implant magnet is required to beremoved under MRI examinations over 1.5T. Under MRI examination equal to orless than 1.5T, the magnet is not required to be removed, but it is required tobe elastically bandaged with an elastic bandage and an elastic
plastic piece toprevent shifting (See the 1.5T MRI examination for details).
2)Before the examination, make sure patient has nofever; take caution to wait the swelling caused by the implantation surgeryreduced, and for most patients it takes two to four weeks. Whether the patienttakes out the magnet for MRI examination or not, the metal case may causeshadows around the implant. Please inform the patient beforehand.
2. Patients’ comfort
Please explain to the patient as follows.
1) Compressionbandages (for 1.5T MRI) may prevent the implant magnet from twisting andshifting, but the patient may still feel pressure. This sensation is similar tothe feeling of pressing the thumb against the skin, which does not damage theimplant or harm the patient.
3. MRI examination kit
When performing 1.5T MRI examination, an MRI examination kit isrequired. The MRI examination kit includes thefollowing:
1) Plastic piece: used to cover the magnetof the implant coil, size: 80*50*1.5mm (Fig. 1 is the plastic piece for MRI examination).
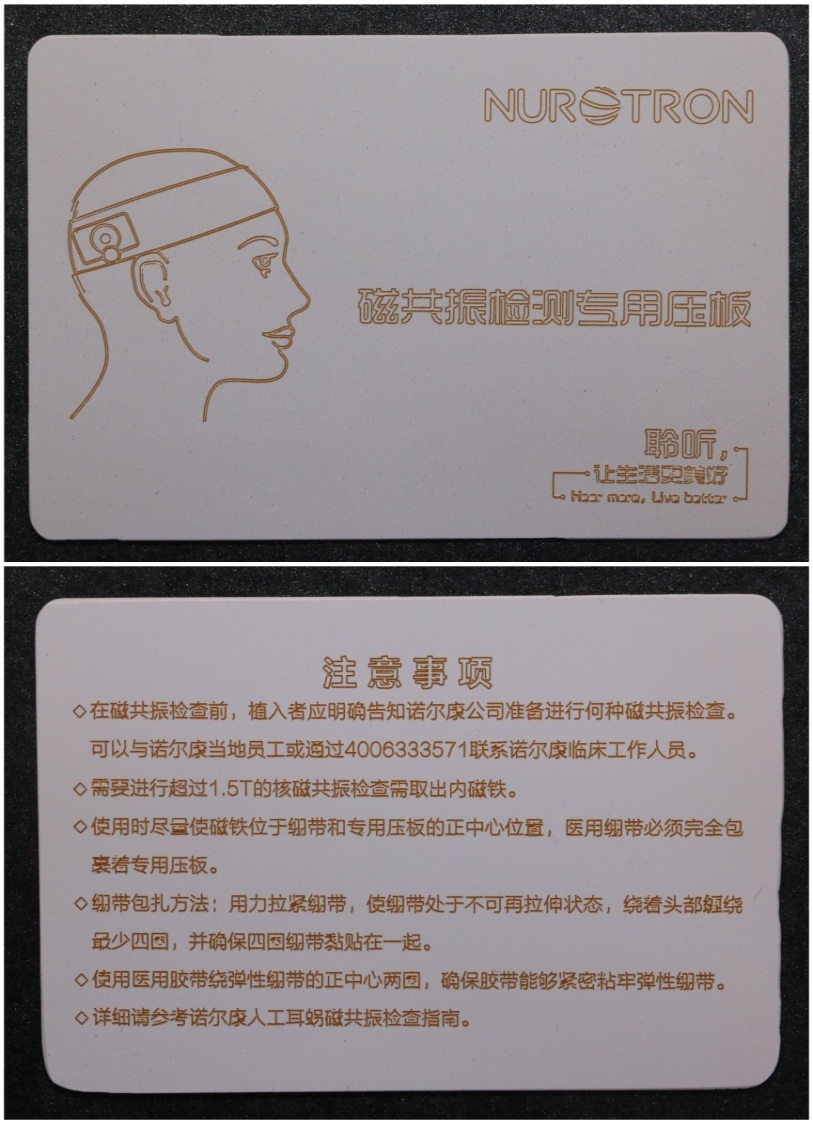
Figure 1. Front and back sides of plastic pieces (Translation ofprinted scripts as follows)
Front Side:Plastic piece for MRI Examination
Back Side:
Precautions
◊ Before the examination, the patient should clearly inform Nurotronof which MRI examination is to be performed. You can contact Nurotron localstaff or Nurotron clinical personnel through customer service hotline 400-6333571.
◊ The implant magnet is required to be removed under 3.0T MRIexamination.
◊ The magnet should be in the center of the bandage and the plastic piece.The medical bandage must be completely wrapped with plastic piece.
◊ Bandaging:Firmly tighten the bandage to its elastic limit, stretch it for at least fourturns around the head, and make sure that the four turns stick together.
◊ Usemedical tape around the center of the elastic bandage to ensure that the tapeis tightly attached to the elastic bandage.
◊ SeeMRI examination of Nurotron Cochlear Implant guide for details.
2) Elastic bandage: used to fix the plasticpiece. It is recommended to use elastic bandage with a width of more than 10cm(as shown in Figure 2).

Figure 2. Example of elastic bandage
3) Medical tape: used to fix elastic bandage andplastic piece.
4. 1.5T MRI Examination
1) Before entering the MRI room, first removethe speech processor and the coil; draw a contour at the scalp of the coil tomark the center of the magnet. If the patient's hair is too dense, shave thehair at the coil to better fix the elastic piece. If the position of the coilis not found, use magnetic material such as a paper clip or the like. However,this magnetic material must be removed before entering the MRI room.
Before entering the MRI room, first removethe speech processor and the coil; draw a contour at the scalp of the coil tomark the center of the magnet. If the patient's hair is too dense, shave thehair at the coil to better fix the elastic piece. If the position of the coilis not found, use magnetic material such as a paper clip or the like. However,this magnetic material must be removed before entering the MRI room.
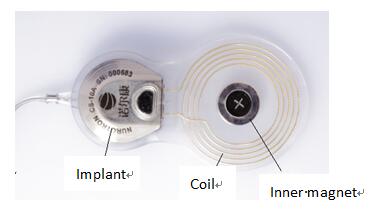
Figure3. The inner magnet position
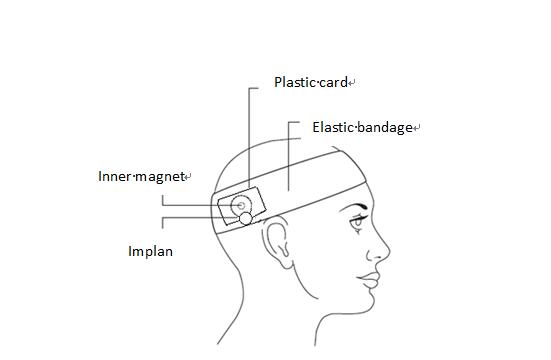
Figure4. The diagram of the fixing of plastic piece andelastic bandages
3) Bandaging: Firmly tighten the bandage toits elastic limit, stretch it for at least four turns around the head, and makesure that the four turns stick together.
4) Use medical tape around the center of the elastic bandage to ensurethat the tape is tightly attached to the elastic bandage.
After 15 minutes of continuous MRI scanning,take break at least 27 minutes and make sure there is no overheating in theimplant position before the next MRI scanning.
5. After1.5T MRI examination
After the MRI examination, remove the elastic bandage and theplastic piece, and wear the speech processor. After the speech processor turnedon, confirm the sound is normal and there is no discomfort to the patient. Ifin doubt, contact your surgeon or Nurotron clinical personnel as soon aspossible.
6. 3.0T MRI examination
The implant magnet is required to be removed under 3.0T MRIexamination, and bandage according to above method before examination. After 15minutes of continuous MRI scanning, take break at least 27 minutes and makesure there is no overheating in the implant position before the next MRIscanning.
Precautions for implantmagnet removal
1) The implant magnet needs to be removedby a professional doctor.
2) Ifthe patient needs multiple MRI examinations, a sterile non-magnetic metal plugis required to replace the magnet implant in order to prevent fibrous tissuefrom entering the crypt for the inner magnet.
3) Afterthe inner magnet is removed, the patient could wear a device such as soft beltto fix the coil of the speech processor between multiple MRI examinations.
4) WhenMRI is no longer required, the sterile non-magnetic metal plug should beremoved and a new sterile internal magnet implanted.
The removal of the implant magnet —surgeon guide
Procedures
Perform systemic or local anesthesia and removethe magnet under aseptic conditions:

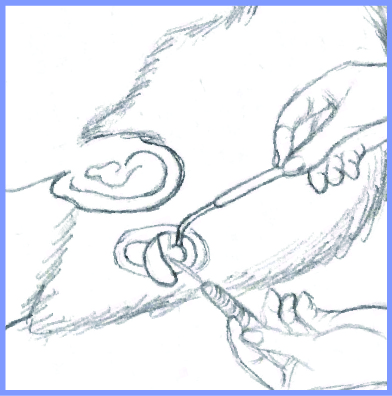
Figure5 Incision on the side of implant Figure 6 Incision of the implant with magnetremoved
1. Make a small incisionto make sure the magnet can be reached. The incision must be on the side of theimplant (do not exceed the coil), see Figure 5.
2. Cut along the fiber growth site aroundthe implant to expose the magnet.
3.Using separator or similar device, carefully lift the top of the siliconeelastic crypt around the magnet and remove the magnet from the implant. Ifthere are residual sutures around the magnet, remove the suture. See Figure 6.
The procedure will vary depending on whether thepatient needs single or multiple MRI examination.
Single MRI
Make a small incision to remove the magnet.
2.Leave the magnet crypt empty. Do not close the wound, cover it with a dry andsterile dressing. The crypt can hold up to 4 hours of sterile empty state.
3. Perform theMRI.
4.After the examination, insert a new sterile magnet with the mark “十” (polarity) facing up. Use separatorto raise the hidden lip and place the magnet.
5. Suture the wound layered.
Multiple MRI
If the patient needs multiple MRI examinations,a sterile non-magnetic metal plug is required to replace the magnet implant inorder to prevent fibrous tissue from growing into the crypt.
Inserta metal plug into the crypt as follows:
1. Makea small incision to remove the magnet. (Figure 6).
2.Use a separator to lift the lip of the crypt and press the non-magnetic metalplug into the place. Be careful not to put too much pressure on the implant.
3. Suture the wound layered.
Whenregular MRI examination is no longer needed:
1.Make a smallincision to expose the magnet crypt.
2. Remove the non-magnetic metal plugaccording to the above procedure.
3.Insert a new sterile magnet with the mark “十” (polarity) facing up. Use a separatorto lift the lip of the crypt and press the sterile magnet into the place.
4. Suture the wound layered.